
Patient Positioning in Radiography: A Visual Guide to Common Projections
Acquiring a high-quality radiograph is a skill that depends on three factors: setting the correct exposure technique, providing clear instructions to the patient, and, most importantly, precise patient positioning. Proper positioning ensures that the correct anatomy is visualized without distortion or superimposition, which is essential for an accurate diagnosis. This guide covers the terminology and basic setup for some of the most common radiographic projections.
Understanding Projections and Views
The term "projection" describes the path of the central X-ray beam as it travels from the X-ray tube, through the patient, to the detector. A "view" is the resulting image as seen by the detector.
- Anteroposterior (AP): The X-ray beam enters the anterior (front) surface of the body and exits the posterior (back) surface.
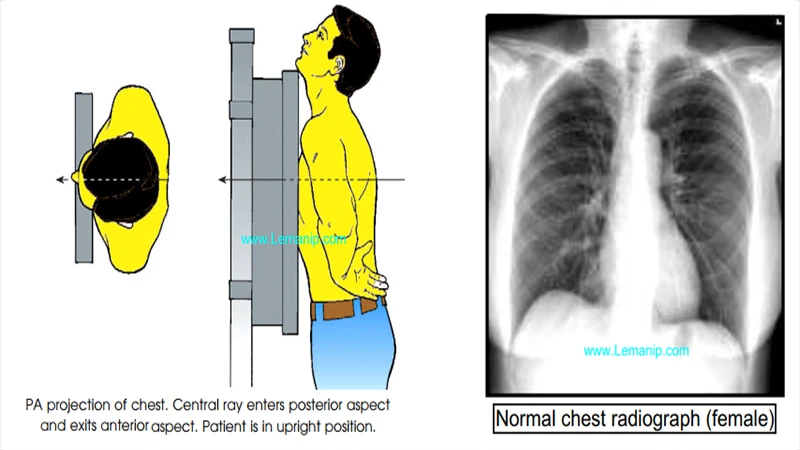
- Posteroanterior (PA): The X-ray beam enters the posterior (back) surface and exits the anterior (front) surface. This is the preferred projection for a chest X-ray.
- Lateral: The beam enters one side of the body and exits the other. The side closest to the detector determines the name (e.g., a "left lateral" means the patient's left side is against the detector).
- Oblique: The body is rotated at an angle to the detector, providing a view that is not purely AP, PA, or lateral.
Example 1: The PA Chest X-Ray
The PA chest X-ray is one of the most frequently performed exams. The PA projection is preferred over AP because it places the heart closer to the detector, reducing magnification and creating a more accurate representation of heart size.
- Patient Position: Patient stands upright, facing the detector (bucky).
- Instructions: Chin up, shoulders rolled forward to move the scapulae out of the lung fields. Patient takes a deep breath in and holds it.
- Key Anatomy: Both lung fields, heart silhouette, diaphragm, and costophrenic angles should be clearly visible.
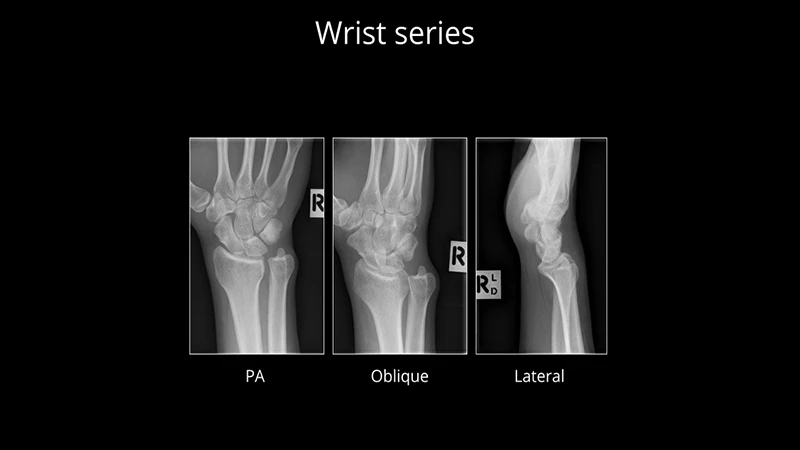
Example 2: The 3-View Hand X-Ray
A standard hand series is crucial for diagnosing fractures and arthritis. It typically includes PA, oblique, and lateral views.
- PA View: Patient places their hand palm-down flat on the detector.
- Oblique View: From the PA position, the hand is rotated externally about 45 degrees, often resting on a foam wedge. This view helps separate the metacarpals.
- Lateral View: The hand is turned onto its side, with the thumb up, like in a "karate chop" position. This view is excellent for visualizing foreign bodies and fracture displacement.
Example 3: The 3-View Foot X-Ray
Similar to the hand, a foot series helps visualize the complex bone structure from multiple angles.
- AP View: Patient is seated or lying on the table with their foot flat on the detector. The X-ray tube is angled slightly toward the heel.
- Oblique View: The foot and leg are rotated medially (inward) about 30-45 degrees.
- Lateral View: The patient lies on their side with the foot positioned laterally on the detector.
Conclusion: The Foundation of Diagnosis
Precise and consistent patient positioning is a fundamental skill for every radiologic technologist. It is the foundation upon which a correct diagnosis is built. By mastering anatomical landmarks and understanding the purpose of each projection, technologists can produce high-quality images that clearly demonstrate the necessary anatomy, minimize the need for repeat exposures, and ultimately provide the best possible care for the patient.
Comments